Affine Transforms in iOS for Fun and Profit - Guest Post
Guest post from Warren Moore
Imagine we want to build an iOS app that allows us to select regions of an image. These regions might be selected for manipulation by some image processing algorithm, or perhaps some machine learning (ML) procedure. Many ML algorithms perform better when directed to focus on specific image regions, and selecting image regions is an integral part of ML work such as labeling.
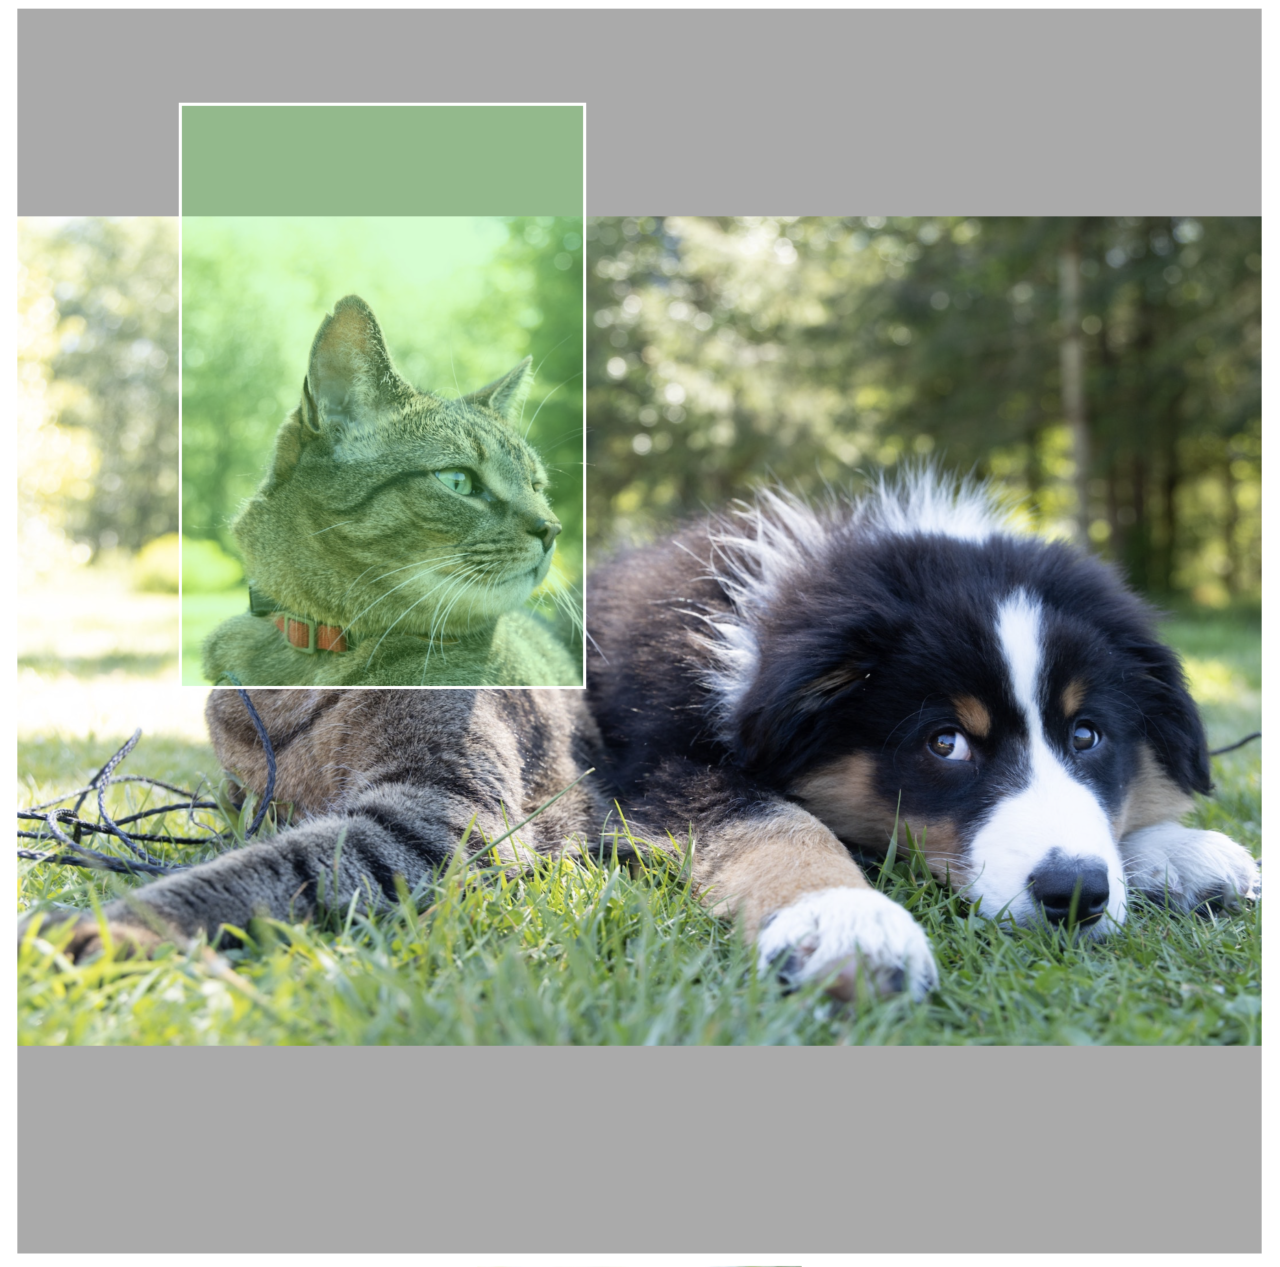
For the sake of discussion, suppose the subject image is being displayed by a UIImageView which is a subview of the view that hosts our selection UI. In this scenario, each selected region is represented by a UIView whose bounds are chosen interactively by the user by tapping and dragging. The user interface might look like this:

In this example, the selected region (highlighted in green) lies partially outside the image’s bounds, and furthermore the image has been scaled by the image view to maintain its aspect ratio, via a content mode called aspect-fit. The question we want to answer then, is: What region of the subject image is selected? To answer this, we need to traverse a number of coordinate spaces, but ultimately this is a matter of combining applied linear algebra with creative use of Apple’s APIs. In particular, the process decomposes into a sequence of coordinate space transformations, summarized as follows:
First, convert the selected region from the coordinate space of the selection view into the space of the image view. Since these two views have a common ancestor in the view hierarchy, we can ask UIKit to do this work for us.
Second, we need to account for the aspect-fit scaling of the image view. This can be decomposed into a scale and a translation. We will consider the two special cases inherent in this transformation below.
Third, we need to constrain the selection rectangle to the image bounds, since we are only interested in regions that actually contain image pixels.
Finally, we need to consider whether to quantize the selection region to pixel boundaries and/or normalize it into a coordinate-independent format. We will discuss these considerations below.
So, how shall we implement this procedure? It turns out that the UIKit and Core Graphics frameworks have utilities that make it all straightforward once we understand the problem we’re solving. Throughout the following discussion, it is important to note that most operations take place in coordinate spaces whose fundamental unit is a device independent unit called a point, rather than operating directly on pixels 1.
First, to convert between coordinate spaces, we use UIKit’s built-in facilities:
let selectionInImageView = imageView.convert(selectionView.frame, from: view)
where view is the immediate parent of the image view and the selection view.
The trickiest part of the process is how to account for the aspect-fit scaling of the image view, since the transformation is internal to the implementation and not immediately available to API clients. However, as outlined above, we know that in the aspect-fit case, the image first must be scaled to match the dimensions of the image view—while maintaining its aspect ratio—and then moved (translated) such that its center winds up in the center of the image view.
There are two special cases to consider: (1) when the aspect ratio of the image is wider than the aspect ratio of the view (in which case we determine the scale factor to be the ratio of the view’s width to the image’s width), and (2) when the aspect ratio of the image is narrower than the aspect ratio of the view (in which case the scale factor is the ratio of the view’s height to the image’s height). The scale factor is the same for both dimensions, since the purpose of aspect-fitting is to preserve the proportions of the image.
The translation transform then encodes how far the image needs to move in the coordinate space of the view to be centered. The whole routine can be implemented as an extension on UIImageView if desired. The core code is as follows:
let imageAspect = image.size.width / image.size.height
let viewAspect = bounds.width / bounds.height
let scale = (imageAspect > viewAspect) ?
  bounds.width / image.size.width :
  bounds.height / image.size.height
let scaleTransform = CGAffineTransform(scaleX: scale, y: scale)
let offset = CGPoint(
  x: (bounds.width - (image.size.width * scale)) * 0.5,
  y: (bounds.height - (image.size.height * scale)) * 0.5)
let translationTransform = CGAffineTransform(translationX: offset.x,
                                             y: offset.y)
return scaleTransform.concatenating(translationTransform)
Suppose we wrap this code in an extension method called imageTransform. Then, to transform our selection rectangle from image view space into image space, accounting for aspect-fit scaling, we apply the inverse (opposite) of the image transform:
let selectionInImage = selectionInImageView.applying(aspectFitTransform.inverted())
With this accomplished, we almost home free. We next need to apply the constraint that the selection only applies to pixels inside the image.
let clippedSelection = selectionInImage.intersection(CGRect(origin: .zero,
                                     size: image.size))
It is possible for this method to return an invalid rectangle called the null rectangle. This happens when there is no overlap between the selection region and the image, which should be handled as a special case.
At this point, we need to consider the desired final format of our selection region. If we want it to be expressed in pixels rather than points, we need to account for the fact that UIImage has a scale property relating image points to image pixels. We can find the selected region in image pixels by creating yet another scaling transform and applying it to our region expressed in points.
let imageScale = image.scale
let selectionInPx = clippedSelection.applying(CGAffineTransform(scaleX: imageScale,
                                            y: imageScale))
Some algorithms will want to operate on whole pixels rather than the fractional values that result from the previous operations. In that case, we can snap the selection rect to the nearest pixels with the integral method on CGRect:
let integralSelectionInPx = selectionInPx.integral
As one final Core Graphics trick, you can crop an image to a selected region with the cropping(to:) method of CGImage. CGImages operate in pixels, so you’ll need to use the pixel-based region we created above to operate on them.
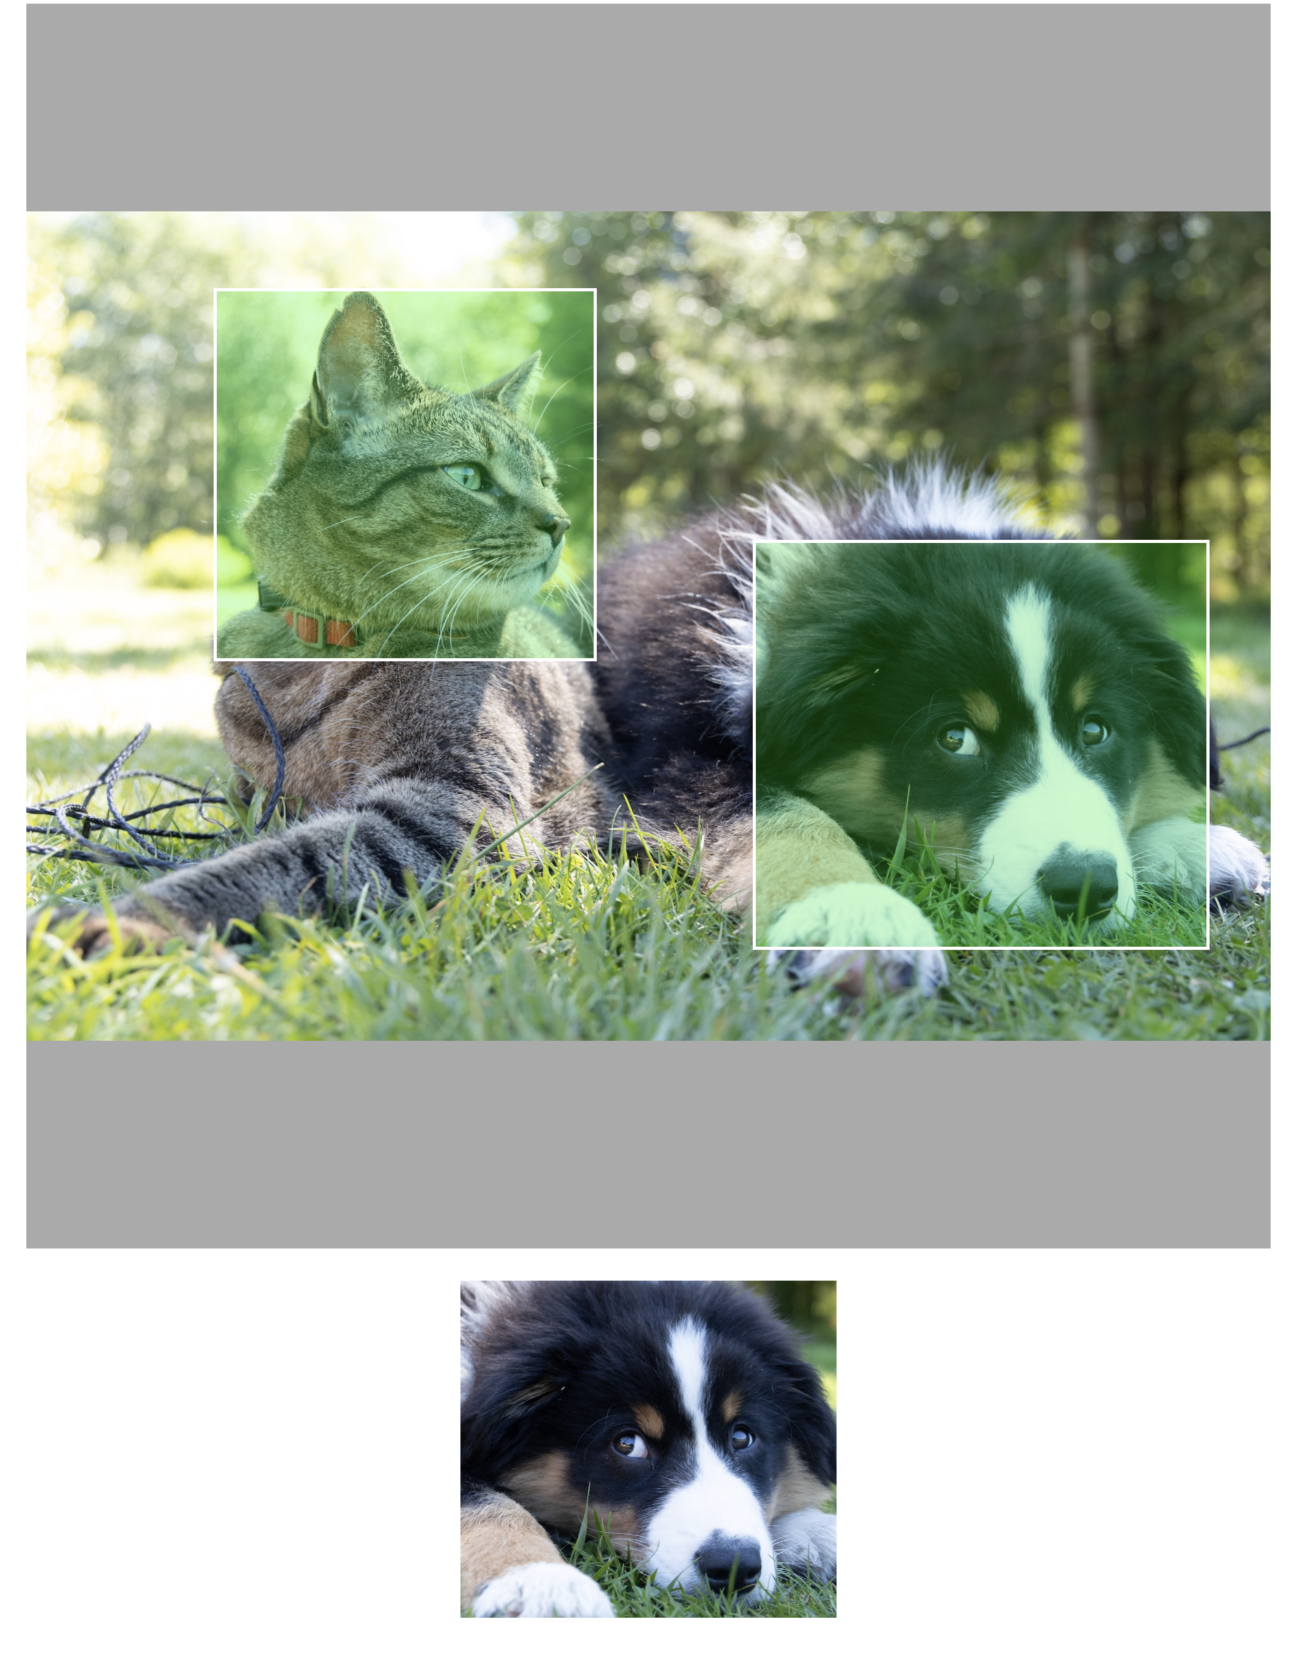
The following code snippet creates an image from the selected region and displays it in a separate image view so we can see our work in action:
if let subimage = cgImage.cropping(to: integralSelectionInPx) {
    selectionImageView.image = UIImage(cgImage: subimage)
}
And here’s the result of selecting our furry friends:

Rather than expressing the region as integral pixels (i.e. where the origin and extent of the bounding rectangle are whole numbers), we could also normalize it so that the x and y axes of the image run from 0.0 to 1.0. This is done by dividing the coordinates by the image width and height. The virtue of this choice is that even if the image is ultimately downsampled or distorted disproportionately, the region will still correspond to the area selected by the user. Different software packages expect different inputs in this regard.
As a final note, the procedure described above is not robust to interface resizing or rotation. Storing selection regions in normalized coordinates (where the upper left corner of the image is (0, 0) and the bottom right corner is (1, 1)) can also alleviate this issue to a significant degree, so consider using them at every step along the pipeline, rather than leaning on coordinate systems that might shift underneath you.
You can take a look at the example project used in the article here.
When working with images and graphics on Apple platforms, you almost never have to worry about working at the pixel level. You generally will never have to worry about accessing raw pixels - the Operating System abstracts this away for you. However, if you’re building something like a photo/video editing app, or working with an image-based CoreML pipeline, you may find that you need to work with pixels. ↩︎